
How to Publish an App on the AppExchange
Recently, we at Arkus have launched a new application called The Permissioner. As the product manager, it was my job to create the listing and see the publishing through from start to finish. Let’s explore what it takes to list an app on the AppExchange. This is a longer blog post, but contains good tips about things to look for.
In order to list apps, you must be a registered Salesforce.com partner. If you are not registered, visit this link to register for the Partner Program. As partners, visit the Publishing tab and login with your Salesforce credentials (note: even if you are not a registered partner, you can get a quick snapshot of the page that registered partners see before it redirects you to a login screen).

Assuming that we have logged in and can view our publisher page, we are presented with this graphic. I am going to decompose the links and each step into separate components to review what it takes to prepare an app and listing.
Provider Profile and Orgs
Beneath “Welcome Arkus, Inc!”, there are two links. “Your Provider Profile” displays basic company information: website, email address, phone number, etc. It also allows for a short description about the company. It is important to keep the focus of this general, as it can be accessed from any app or service listing associated with this AppExchange account. “Your Organizations” is much more important for listing an application, as it connects the org in which the app is being developed to the AppExchange. Let’s explore what this page means in greater detail.
Every provider must have an AppExchange Publishing Org (APO), which is the same as the org registered with the Partner Program. Additionally, applications are typically developed in sandboxes or Developer Edition orgs. The packages from these orgs are connected to the AppExchange by entering the org ID and login credentials. Whenever a new package is created in these orgs, it is possible to update your versions on listings.
Create Your Listing
Now that the company org is connected as the APO and the developer org is added as a linked org, it is possible to create a new listing and associate a package with it. From the publishing tab, there is a Create New Listing button. A dialogue box appears asking for the name and whether it is an app or service.

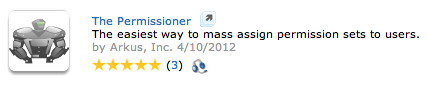
The next screen displays 7 tabs with fields that we can populate: Basic, Offering, Overview, Specs, Support, Uploaded Content, and Leads. The first tab is Basic, and has fields like the title, a description, search blurb, and categories. You may also associate other apps or services to appear on the listing, which provides upselling and cross-selling. Most of these are fairly self explanatory, but search blurb is not required though an important part of a listing. The text in this field appears on search results, and can be seen in the image below beneath the listing title. Without this text, the listing description is used and truncated instead.
Our second tab is Offering, which contains three sections. The first asks if the app is a package or uses the API and where installers should go to get the app; pretty basic information. The next section allows for a package to be associated with the listing. This is where linking the orgs from above comes into play. By associating a package, it allows for us to link the released version of The Permissioner package and submit it for a security review. Finally, we have the ability to create a test drive org, which allows for a user to login and test out the app as a read-only user. I highly recommend creating this org and populating it with data to allow your app to shine!
Our next tab, Overview, is where we expand on the highlights and long description about the app. Using the screenshot below, I will point out where the text comes from. The red section is from the description field on the Basic tab. The green and blue sections are from the highlight fields and full description field on the Overview tab.

Specs and Support tabs allow us to explain which orgs our app supports, and if there is technical support and at what cost it is provided. The Permissioner is a supported app and free support exists for its users. If using a freemium or premium support model, pricing and terms can be specified. The Uploaded Content tab is where logos and banner, screenshots, installation guides, white papers, and other supporting documents may be uploaded for users to review. You may also link a video from this tab, like we did for our Compliance for Chatter app.
Leads is the final tab, and possibly the most important to judge how an app is performing. From this tab, we linked our Salesforce org that we use on a daily basis. This allows us to use standard Web-to-Lead functionality to respond to and track our leads that install, test, or watch the demo video for our app. Also, a campaign from this org can be linked for each of these events.
Security Review
Before Salesforce approves any listings, the app must undergo tests from their security review team. From the Offering tab, we can submit the package associated to the listing to the AppExchange for approval. An email is automatically generated and sent to the submitter asking for a Checkmarx security test and questionnaire to be completed. These include some general questions about the app, if there are Apex classes and Visualforce components, etc. If the app fails the first round, don’t worry; go back and fix the problems that are noted by the Checkmarx test or from the AppExchange team.
If the app does fail, correct the issues and resubmit it for a test. When we submitted The Permissioner, the team said that it may take up to four weeks to review due to high demand for app approvals; but, it only took them one week to review the app. Keep your spirits high during this period and use the time to review the listing and all supporting material for when the app gets the go-ahead.
After Approval, Going Public
Following approval, the app can be made into a public listing. This is done from the publishing tab from the screenshot above. On this tab are Your Public Listings and Your Private Listings. On the private listings tab, the app will have a link saying “Make Public”. At this point, the app is available on the AppExchange for any and all to see. Also, Salesforce includes this recent addition in the weekly AppExchange Digest emails that are distributed, providing some free press for your app in the community.
I hope you enjoyed this walkthrough of the AppExchange listing process, and if you have any questions or comments about listing, please don’t hesitate to leave them below via Disqus, on our Facebook page at http://www.facebook.com/arkusinc, or via Twitter @RogerMitchell.