
Mastering Salesforce Custom Buttons - Part 1
Custom Button Concept
While it has been a trick of the elusive Salesforce Administrator for a long while, the custom button can be used in a lot of business cases. It can do everything from being the one click link between two objects to as complicated as pre-populating a lot of fields on a new record on a different object. Mastering the custom button can help administrators cut down on complaints and help users get their work done faster with less fields to fill out.
For this blog post series, I am going to be using a very fictional example of creating a new project from an existing closed won opportunity. The business use case is once an opportunity has been closed won, the project manager needs to create the project which is a totally different object, but has a lot of the same fields as the opportunity such as name, start date and description.
Knowing Your URLs
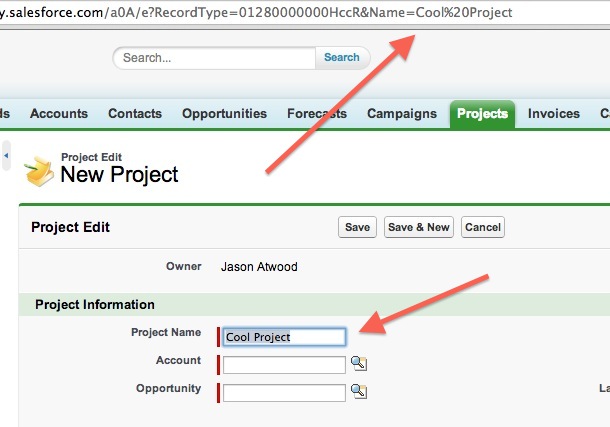
The first thing you need to know to master your custom buttons is the URLs for creating new records. To figure out what they are just click a new button from anywhere in Salesforce and you can take a look the URL in the browser and for whatever comes after salesforce.com. You can copy that url, open a new window and test it by putting in the URL bar and hitting return. It should bring you, button-less, to that new form page. For objects with record types you will have to choose your record type first to get the full link and note the “RecordType=” as the ID of the record type for your new custom button.
In the screenshot below you can see I have referenced the object /a0A/ and the create new form “e” and am referencing a Record Type.

That, was the easy part.
Passing Parameters
Ready to get into a little HTML? Good, because that is the way to figuring out which parameters you need to pass in the URL string. On the new form page in a modern day browser (Safari/Chrome) you can right-click in the form element you want to inspect and choose “Inspect Element” which will bring up a new window with all the glorious Salesforce HTML. You are looking for the form element which usually starts with “input” (in screenshot below).


For the Name of the project below, we are looking for the “Name” id and simply add that to the URL string after another ampersand and test it by hitting the return button. If everything goes well, the name of our new project should be filled out in the Project Name Field.
Easy right?
Create Your Button
Now that you have the URL and parameter you are going to pass between objects it is time to go create that first button. Back on the source object, in this case the Opportunity, in setup create a new Detail Page Button, give it a name, choose your behavior and then paste the URL into the button field. Using the Insert Field widget and add the source field parameter, in this case Opportunity Name, after the equal sign. This is telling the button to pass the Opportunity Name into the form in the Name of the new project.

Save the button, add it to the page layout and test away. You might want to play with the window behavior depending on the business case.
In Part 2 we will come back and discuss how to do complex things like populating lookup fields and in the meantime, you leave comments below or hit me up on Twitter @JasonMAtwood