
What is Omni-Channel for Salesforce?
Omni-Channel is a tool that sits inside of either the Sales or Service Console that, once enabled and configured, automatically pushes work to your users in real time. For example, one can configure routing rules to assign cases to agents through Omni-Channel or configure routing rules to assign leads to sales people. Omni-Channel currently supports leads, cases, chats, SOS video calls, social posts, orders, and custom objects with the goal to be getting the right work to the right person who has the capacity to help. In this example, let’s review how a case can be routed using Omni-Channel.
Without Omni-Channel, agents often rely on list views to find new cases to work. From the list view, the agent selects a case, reassigns ownership, and then gets going. This leaves much room for improvement as lower priority cases may be grabbed before those with higher priority, and agents can cherry pick their work, often resulting in the same agents consistently working the more complex cases while others skate on their coattails.
First, you’ll want to set up a Service Channel on the case object. I think Salesforce themselves says it best in that, “Service Channels let you turn most Salesforce objects such as a case, lead, SOS session, or even a custom object into a work item. Omni-Channel then plucks these work items from their Queues—like flowers from the garden of agent productivity—and routes them to your agents in real time.”
Once a Service Channel has been configured, you’ll move on to setting up a Routing Configurations. Routing Configurations determine how items are routed to your users. It’s here where you can prioritize the importance and size of the case. Finally, assign the Routing Configuration to a Salesforce queue and the items in that queue are pushed to your agents based on that Routing Configuration.
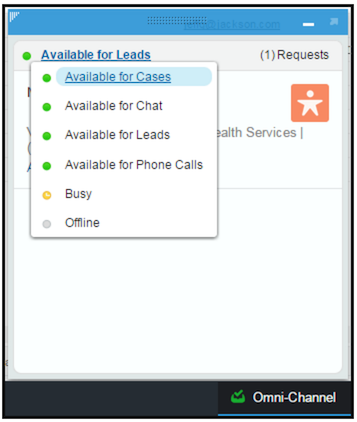
To use Omni-Channel a footer component must be added to the console. Once the footer component is added and Omni-Channel is fully configured, when a new case comes in the request pops into a chat-like window based on which agent available and has the capacity to take on additional work. Presence statuses must be configured as a part of the Omni-Channel setup and similar to Slack or G-Chat allow users to determine if they are available, unavailable or offline. You can configure as many presences statuses as are needed and assign them via a permission set. From here agents can also either accept or decline the work and include a reason as to why work is being declined.
For managers, Omni-Channel opens agent productivity reporting in a way that was never possible before. By leveraging reports on the User Presences object, you can easily see how much time an agent is spending in a particular presence status. Curious to know how many cases your agents are declining? Curious to know how long agents are looking at a particular case? Run a report or create a dashboard on the Agent Work Object. For administrators, Salesforce has a great setup guide that is easy to follow making Omni-Channel well within your reach.
Salesforce continues to improve the Omni-Channel functionality with each release. Most recently with the Summer ‘16 release, we gained the ability to track the time people spend on work items, provide a decline reason, and enable and disable sound notifications.
Has Omni-Channel helped make your service or sales team more efficient? Share your stories in the comments below or in the Success Community.