
Improving your Lead Assignment Logic with Declarative Round Robin
Relatively new to the AppExchange Marketplace, Lead Assigner by Arxxus Technology Partners (not to be confused with us here @ArkusInc) is a powerful offering that takes standard lead assignment and supplies it with a healthy dose of steroids. The best part being that it is completely declarative in nature and doesn’t require a single line of code. Boasting a drag and drop user interface, it’s easy to assign users to different groups based on a myriad of rules utilizing day of week or time logic and/or customized execution criteria.
For purposes of this post though, we’re going to focus on leveraging Lead Assigner to create round robin assignments. If you’re not familiar with the round robin approach, it means that something, in our case a lead, is assigned to the first user in a given group. When a subsequent record is created, it goes to the second user in the group. This process is repeated until there are no more group members and then the cycle repeats.
For purposes of this post though, we’re going to focus on leveraging Lead Assigner to create round robin assignments. If you’re not familiar with the round robin approach, it means that something, in our case a lead, is assigned to the first user in a given group. When a subsequent record is created, it goes to the second user in the group. This process is repeated until there are no more group members and then the cycle repeats.
| Lead Number: | Assigned To Rep: |
|---|---|
| 1 | George |
| 2 | Sarah |
| 3 | Bill |
| 4 | George (notice the rotation here?) |
| 5 | Sarah |
| 6 | Bill |
While Salesforce has a basic solution in the auto-number and formula method, it can only distribute leads on an all or nothing basis which doesn’t work well for most organizations. This method causes issues in the event a user creates a lead which they wish to assign to oneself. Because the auto-number logic runs 100% of the time another user inevitably misses their turn in the rotation. This is where Lead Assigner comes in to save the day.
In our example we will assign leads based on product interest. Acme Supplies, our test account, has three main interest areas by which they disperse leads.
- Paper
- Writing Utensils
- Binding Materials
Acme Supplies has seven salespeople each of whom specialize in one or more categories. The logic is outlined in the table below and shows each sales representative along with the category or categories to which they align. This will be important a bit later when we set-up the round robin assignment.
| Sales Rep: | Specialty #1: | Specialty #2: |
|---|---|---|
| George | Paper | Binding Materials |
| Sarah | Paper | |
| Bill | Writing Utensils | Paper |
| Jennifer | Writing Utensils | Binding Materials |
| Alan | Writing Utensils | |
| Sally | Binding Materials | Writing Utensils |
| Laura | Binding Materials |
To get started you’ll first need to install Lead Assigner from the AppExchange. I recommend installing into a sandbox for testing prior to installing into a production environment.
Next you’ll customize the two Type fields, installed as a part of the package, to align with the criteria you’ve outlined for dispersing leads.
- Go to Salesforce Setup
- In the Quick Find / Search box search “Installed Packages”
- Click on the Link
- Click Lead Assigner
- Click View Components Button
- Select the custom field called Type where the Parent Object is Assignment Rule. The API Name is arxxusleadassig__Type__c.
- Modify the picklist values to the criteria you defined in the table above. For purposes of our case study, the picklist values are Paper, Writing Utensils and Binding Materials.
- Repeat steps 6 and 7 for the Type field where the Parent Object is Lead. The API name is arxxusleadassig__Type__c.
- Delete Software and Hardware from the list of available values
Now that you’ve completed the package modification you’re ready to set-up your assignment rules.
- Go to your Lead Assignment Manager Tab
- Click the “New” Button
- Complete the form using the table below as a guideline
- Save
- Repeat for all of your groups
| Field: | Type: | Description: |
|---|---|---|
|
Description |
Text |
This is the name of the rule. It should be short, sweet and to the point. I suggest using a combination of the assignment criteria and the group to which the leads are dispersed. For example: Paper - Northeast or Paper - Southwest. |
|
Start Time |
Integer (0-23) |
This is a representation of 24-hour time. You can only use hour increments and if start is 0 and end is 23 this is representative of a full day lifecycle. |
| End Time | Integer (0-23) |
This is a representation of 24-hour time. You can only use hour increments and if start is 0 and end is 23 this is representative of a full day lifecycle. |
| Assigned to only Logged-in users | Boolean | If checked then the Lead Assigner application will only assign leads to those people with an active Salesforce session. |
| Default User | Lookup |
This the user that will own the lead if all other criteria fail or in the event that assigned to only logged in users is true and there are no users logged into Salesforce. |
| Execute Immediately | Boolean | If checked then the assignment logic runs before lead insert. |
| Execute on Type Update | Boolean | If checked then the assignment logic runs when the Type field is updated. This becomes important when you have workflow or process automation that update the Type field on the lead. |
| Type | Picklist |
This is the field that controls the assignment logic. The values for this field should always match the values on the lead Type field. |
| Active | Boolean |
If true this assignment is active and used for purposes of assigning leads. |
| Business Days | Multi-Select Picklist | This is the day of week on which the assignment will run. For example you can have on rule that has George and Sarah available Monday through Friday and another rule that has George, Sarah and Jill available on Saturday and Sunday. |
Once you finish setting up your rules you’ll see a screen that looks like this. You should have one or more rules for each of your types.

Select one of the rules and then click the Manage Users button.
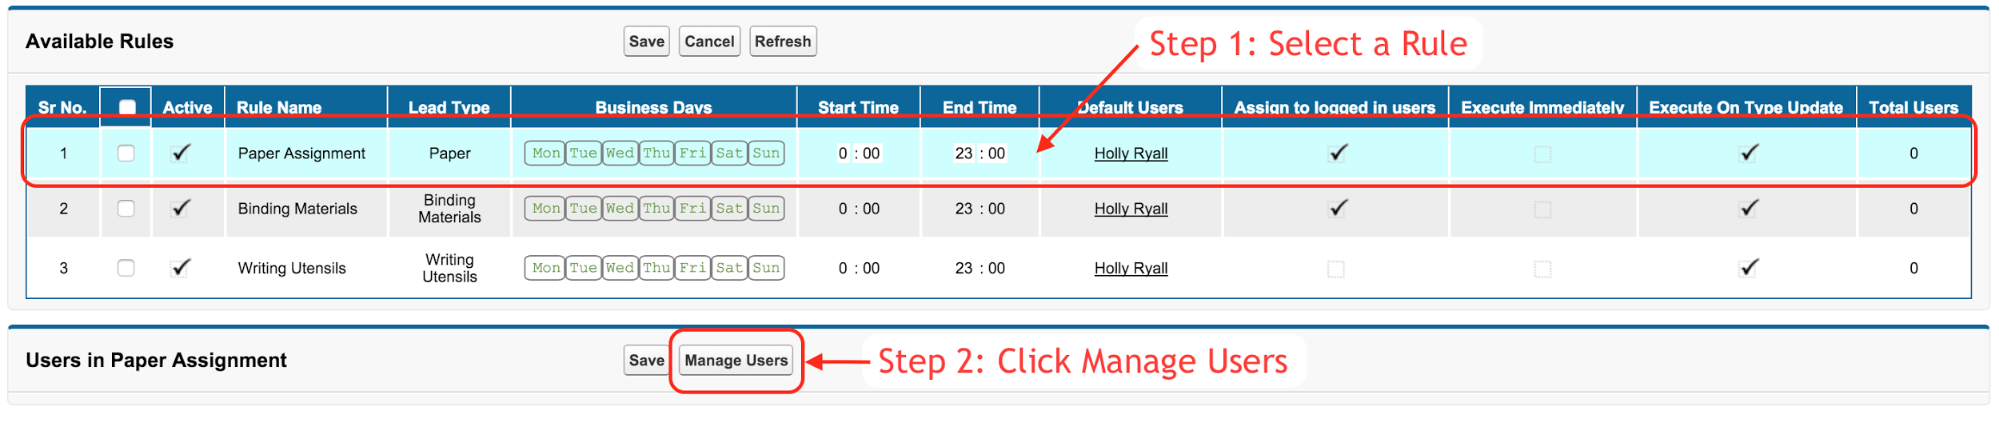
From here, drag and drop the users to be included in the group from the left column to the right and click save.

Repeat for all of the rules and voila you’ve created a round robin lead assignment with clicks instead of code.
With this application the options are endless. Imagine Acme Supplies has a field on their website that takes in “Product Interest” with picklist values Pens, Pencils, 10lb Printer Paper, 20lb Printer Paper, Binders, and Laminated Covers and they serve four states, Massachusetts, New York, New Jersey and New Hampshire. Using workflow or process automation, it’s easy to route Pens and Pencils from leads in New Hampshire to one group and Pens and Pencils from leads in Massachusetts to another. The sky is truly the limit with what this tool can do to improve you sales process and lead assignment.
Please feel free to comment below, on our Facebook page, on the Success Community, or directly at me on Twitter @hollyryall.